Setting up Google Search Console is one of those non-negotiable first steps for anyone who’s serious about their website's performance. It’s a completely free tool that acts as your direct line to Google, giving you a behind-the-scenes look at your site's health and how it shows up in search results. The process is simple: you create an account, add your website as a "property," and prove you're the owner.
Once you’re in, you get direct access to a goldmine of data you can't find anywhere else. For any business, from a local Kansas City contractor to a national e-commerce store, this data is the foundation of a successful digital strategy.
Why GSC Is Your Most Important SEO Tool
Before we get into the nuts and bolts of the setup, let's be clear about why this tool is so critical. Think of GSC as your direct line to Google, offering raw, unfiltered data on how the search engine sees your website. It’s not just another analytics platform; it’s the foundation for making smart SEO decisions.

Without GSC, you're essentially flying blind. You’re left guessing which keywords are actually bringing people to your site or wondering if a hidden technical issue is tanking your rankings.
Uncover Actionable Search Insights
Google Search Console shows you the exact search queries people are using to land on your website. This is incredibly valuable because it takes the guesswork out of your content strategy and helps you truly understand what your audience wants. Unlike other tools that just estimate traffic, GSC gives you the real numbers for clicks and impressions, straight from the source.
This raw data helps you pinpoint some quick wins:
- High-Impression, Low-Click Keywords: You might discover your Kansas City roofing company gets 1,000 impressions for "emergency roof repair KC" but only 5 clicks. This is an actionable insight. Your page title or meta description likely isn't compelling enough. Changing it from "Roofing Services" to "24/7 Emergency Roof Repair in Kansas City | Free Estimates" can dramatically improve your click-through rate.
- Unexpected Keywords: You'll often find you're ranking for terms you never even thought to target. A local plumber might find they're getting traffic for "how to fix a leaky faucet without a plumber." This is a perfect opportunity to write a detailed blog post on that topic, capturing even more of that audience.
- Performance by Page: You can easily see which blog posts or service pages are your heavy hitters and which ones are underperforming and need a little love.
Diagnose and Fix Technical Issues
Technical errors are the silent killers of SEO campaigns, and GSC is your early warning system. It alerts you to the kind of problems that stop Google from being able to crawl, index, and serve your pages correctly.
Google Search Console is the only place to get a true picture of your site's indexing status. It tells you which pages are in Google's index, which are excluded, and precisely why.
For example, GSC will flag things like mobile usability problems, slow page speeds (your Core Web Vitals), and crawl errors that might be making some of your best pages invisible in search results. Fixing these issues is a massive part of learning how to improve website SEO and ensuring all your hard work actually pays off. The tool has been around since 2006 (originally as Google Webmaster Tools), and by 2020, over 10 million websites were relying on it for these critical insights.
Alright, let's dive into your first big choice when setting up Google Search Console: should you go with a Domain property or a URL Prefix property?
This might sound like a minor technical detail, but it's not. The option you pick fundamentally changes how GSC gathers and shows you data. Getting this right from the get-go is crucial for seeing the complete, unfiltered picture of your site's health and performance.
Think of it like getting the keys to a new building. The Domain property is the master key—it opens every single door. The URL Prefix property is just a key to a single room.
The Power of a Domain Property
For just about everyone reading this, the Domain property is the way to go. I’d go as far as to say it's the only option you should seriously consider today. It’s the modern standard, and it makes your life so much easier by tracking every possible version of your site under one unified profile.
This means it automatically scoops up and combines data from:
http://yourwebsite.comhttps://yourwebsite.comhttp://www.yourwebsite.comhttps://www.yourwebsite.com- And, crucially, all your subdomains (like
blog.yourwebsite.comorshop.yourwebsite.com)
This all-in-one approach gives you a true, holistic view without forcing you to click between five different profiles to piece the story together. If you're launching a new site, starting with a Domain property is best practice, period. We cover more of these foundational steps in our guide on how to launch a new website correctly from day one.
When to Consider a URL Prefix Property
So, what about the other option? The URL Prefix property is much more restrictive. It only tracks performance for the exact web address you type in. If you set it up for https://www.yourwebsite.com, it will completely ignore any traffic that happens to land on the non-www version.
While once the default method, the URL Prefix property now serves very specific, niche purposes. It’s really only useful if you need to isolate data for a single subdomain or protocol for a deep technical analysis—something most small businesses will never need to worry about.
For example, a massive international e-commerce site might use it to track their German subdomain separately from their main site. But for over 95% of users, especially if you have a standard business site, blog, or local shop, the Domain property is the undisputed champion. It simplifies your setup and ensures you're not accidentally missing out on valuable data.
Verifying Your Website Ownership
Once you've told Google which site you want to track, the next step is proving you actually own it. This might sound a bit technical, but it's really just a quick, crucial handshake. Think of it as Google handing you the official keys to your property so you can access all of your website's private search data.
There are a few ways to get this done, and the right one for you really depends on your technical comfort level and how your site is built. If you chose the Domain property option, Google requires you to use the DNS record method. For URL Prefix properties, you've got a bit more flexibility.
Choosing Your Verification Method
The most robust and widely used method is adding a special TXT record to your domain's DNS settings. This does require you to log into your domain registrar (like GoDaddy or Namecheap), but it’s a "set it and forget it" solution that proves ownership at the highest possible level. It's the standard for Domain properties and the method most SEO pros prefer.
If you're working with a URL Prefix property, you have a few simpler options on the table:
- HTML file upload: Google gives you a specific file to download, which you then upload to your website's root directory. This is a solid choice if you have access to your site's backend via FTP or a file manager.
- HTML tag: With this method, you get a small snippet of code to add inside the
<head>section of your homepage. It's perfect for WordPress users who can easily edit their theme's header file or use a simple plugin. - Google Analytics or Tag Manager: If you already have other Google services running on your site, you can often verify ownership with a single click. As long as your tracking codes are set up correctly, this is by far the fastest route.
Don't overthink this step. The goal is simply to prove you're the owner. If you have Google Analytics installed, that's often the quickest way. If you're comfortable logging into your domain registrar, the DNS method is the most permanent and comprehensive choice you can make.
This chart breaks down the main trade-offs between the primary verification methods, looking at their scope and how quickly they work.
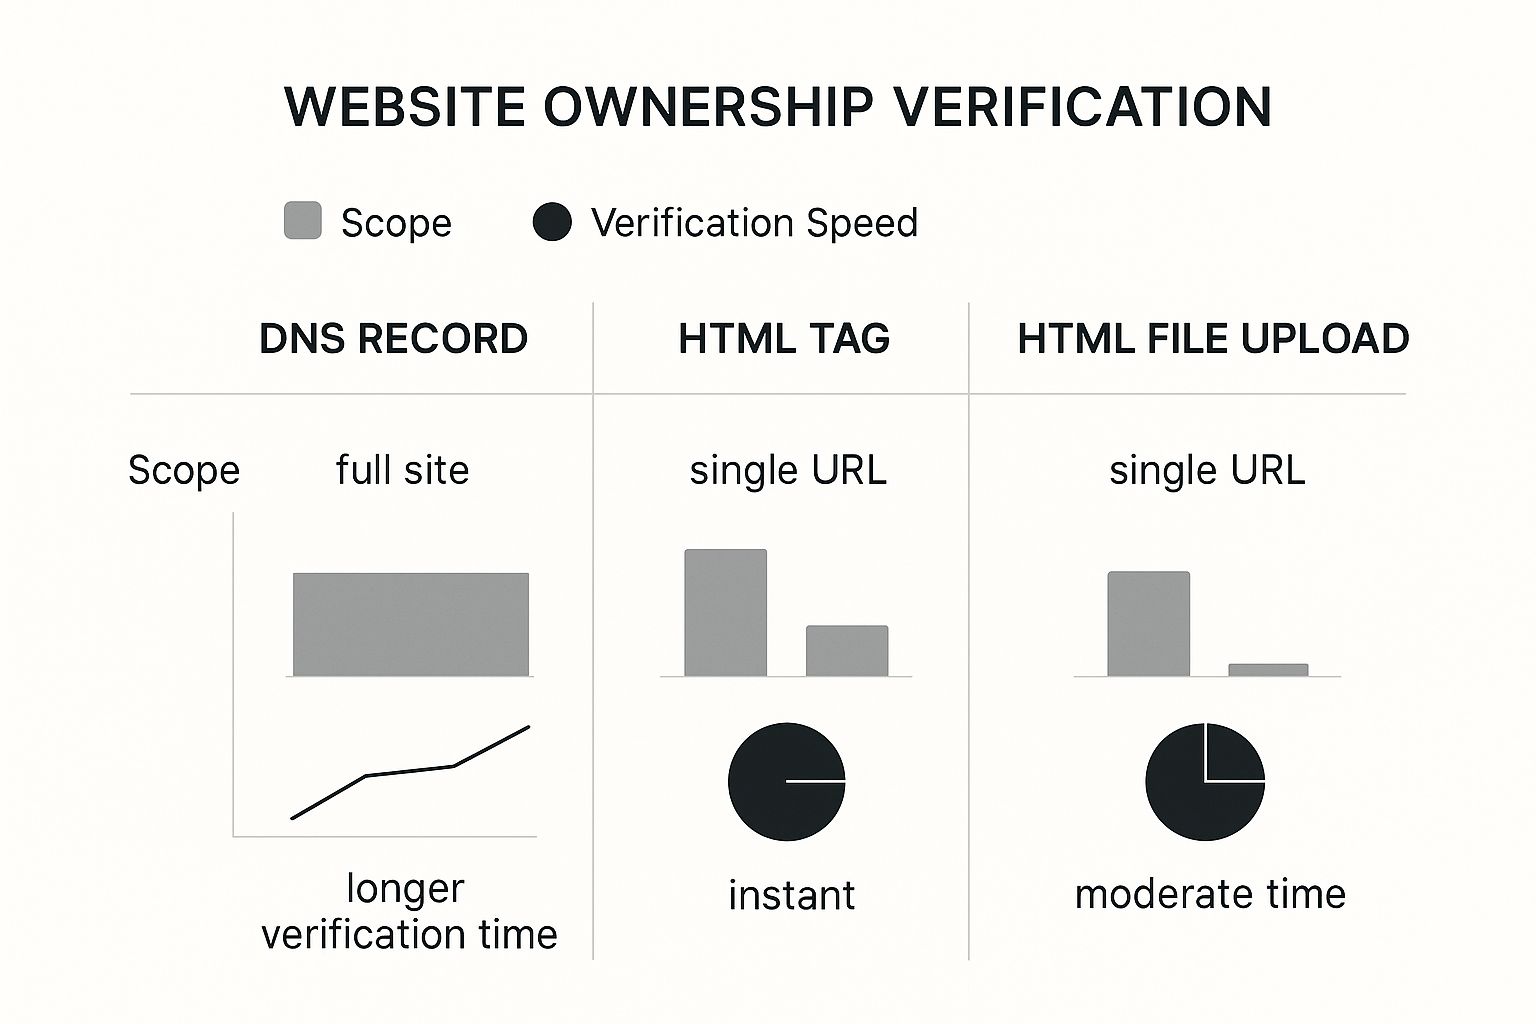
To make the decision even clearer, here’s a quick comparison of the most common methods.
Comparison of GSC Verification Methods
Choose the best verification method for your website based on ease of use, technical requirements, and potential permanence.
| Verification Method | Best For | Technical Skill Required | Pros & Cons |
|---|---|---|---|
| DNS Record (TXT) | Domain-level properties; users who want a permanent, comprehensive solution. | Moderate: Requires logging into your domain registrar. | Pro: Verifies all subdomains (www, non-www, http, https) at once. Con: Can take up to 24-48 hours for changes to propagate. |
| HTML File Upload | Users with file manager or FTP access to their website's root directory. | Low-to-Moderate: Basic file management skills needed. | Pro: Verification is almost instant once the file is uploaded. Con: Only verifies the specific URL prefix you added. |
| HTML Tag | WordPress users or those who can easily edit their site's <head> HTML. |
Low: Can often be done with a plugin, no code needed. | Pro: Very fast and simple to implement. Con: Tag must remain on the site; removing it will un-verify your property. |
| Google Analytics/GTM | Users who already have Google Analytics or Tag Manager installed. | Very Low: Often just a single click. | Pro: The fastest and easiest method by far. Con: Relies on another service; if GA code is removed, verification is lost. |
Ultimately, the key takeaway is that DNS verification gives you complete coverage for your entire domain but might take a bit longer to process. On the other hand, methods like the HTML tag are nearly instant but only cover the specific URL you're adding.
Once you’ve successfully verified your site, you’re in! You're ready to start digging into your data.
Submitting Your Sitemap to Google

Alright, your site is verified. Now it's time to hand Google a roadmap. A sitemap is basically an XML file that lists all the important pages on your website. Think of it as telling Google, "Hey, forget the guesswork. These are the pages I care about, so please crawl them."
This isn't just a technical formality; it's a huge step toward getting your content indexed efficiently. Submitting a sitemap helps Google discover your new blog posts, product pages, or any updated content way faster than if you just waited for its crawlers to find them on their own schedule.
Locating and Submitting Your Sitemap
The good news is you almost never have to build a sitemap by hand anymore. If you're using a modern CMS like WordPress, the most popular SEO plugins handle all the heavy lifting for you.
- Yoast SEO: Automatically creates your sitemap at
yourdomain.com/sitemap_index.xml - Rank Math: Does the same thing, generating a sitemap at
yourdomain.com/sitemap_index.xml - Shopify: Natively builds one for you at
yourstore.com/sitemap.xml
Once you’ve found your sitemap URL, pop back over to GSC and find the "Sitemaps" report in the left-hand menu. Just paste in the URL of your sitemap file and hit Submit. That's it. Google will take it from there.
A common mistake I see is people submitting their sitemap and then never looking at it again. The real value is in monitoring its status. A "Success" status means Google has read your map and is actively discovering the URLs you listed.
Remember, a clean sitemap is a direct reflection of a well-organized site. Making the most of it starts with understanding how to plan website structure from the very beginning.
Checking Sitemap Status and Errors
After you submit it, GSC will give you a status. If it says "Couldn't fetch," don't panic. This is often just a temporary glitch. Give it a day or so and check again to see if it resolves itself.
If you see other errors, you can click on the sitemap to get more details. GSC is pretty good about telling you exactly what went wrong so you can get it fixed. This simple process ensures Google has a clear path to all your best content, which is key to getting your pages ranked and found by your audience.
Your First Look at Key GSC Reports

Alright, you're in. With your site verified and your sitemap handed over to Google, you’ve unlocked a treasure trove of data. The dashboard can look a little overwhelming at first, so let's cut through the noise and focus on the reports that give you immediate, actionable value.
Your first stop should always be the Performance report. This is the absolute heart and soul of Search Console. It's your direct window into the minds of your audience, showing you exactly which search queries are bringing people to your site.
Uncovering Insights in the Performance Report
This is where you can start finding some incredible opportunities. One of my favorite strategies is to look for queries that have a ton of impressions but a really low click-through rate (CTR). Finding these is like striking gold—it tells you your page is relevant enough for Google to show, but your title or meta description just isn't compelling enough to earn the click. A quick rewrite can make all the difference.
Actionable Insight: Go to Performance > Queries. Filter by 'Impressions' greater than 500 and sort by 'CTR' in ascending order. This immediately shows you your biggest "low-hanging fruit" opportunities for optimization.
To get the full story on what users do after they click, you’ll want to pair these insights with a tool like Google Analytics. We cover more on this in our guide on how to track website traffic, which helps you connect the dots for the entire user journey.
Checking Your Site's Health
Next, let's look at the reports that act as your site's technical check-up. These are crucial for making sure all your hard work actually gets seen by Google.
- Indexing Report: This is your visibility dashboard. It tells you which pages Google has successfully indexed and—more importantly—which ones it hasn't, and why. If a key service page is listed under "Not indexed," you have an urgent problem to fix. This report is your go-to for diagnosing why a page isn't showing up in search results.
- Experience Report: This section is home to Core Web Vitals and Mobile Usability data. These aren't just vanity metrics; they directly impact user experience and are confirmed ranking factors, making this report non-negotiable for modern SEO. A poor mobile experience can kill your rankings, especially for local businesses where most searches happen on a phone.
By keeping a regular eye on these key areas, you'll shift from simply having a Google Search Console account to actively using it as a strategic tool. These initial reports are your first step in turning confusing charts into real insights that drive growth.
Common Questions About Google Search Console
It's totally normal to have a few questions when you're getting your sea legs with a new tool. Let's clear up some of the most common things people ask when getting set up.
How Long Until I See Data?
Don't panic if you log in and see a bunch of empty reports right after you verify your site. This is completely normal.
It usually takes a couple of days for Google to process everything and start populating your dashboards. You can expect to see the first bits of data, like clicks and impressions, roll in within 48-72 hours. Give it about a week to see the more comprehensive reports fill out.
GSC vs Google Analytics
This is a big one. You absolutely need both. They're a powerhouse duo when used together, but they tell you two different parts of your website's story.
- Google Search Console: This is your pre-click tool. It shows you everything that happens before someone gets to your site—what they searched for, how many times you appeared (impressions), and your click-through rate (CTR). Think of it as measuring your performance on the "digital billboard" of Google search results.
- Google Analytics: This is your post-click tool. It tells you what people do after they land on your site—which pages they visit, how long they stay, and whether they complete a goal (conversions). This measures the effectiveness of your website itself.
Linking them together gives you the full picture, from the initial search query all the way to a final sale or lead.
For almost all modern websites, the "Domain" property is the best choice. It consolidates all versions of your site (http/https, www/non-www) into a single view, preventing data fragmentation.
If you've followed every step and still feel like you're hitting a wall, our guide on what to do when your website is not showing up on Google search offers some more advanced troubleshooting tips to get you unstuck.
At Website Services-Kansas City, we specialize in demystifying SEO and building powerful WordPress sites that get results. If you need expert help getting your online presence on track, explore our services at https://websiteservices.io.